Understanding Reacts state management with Redux Toolkit
Do feel managing state with redux toolkit, don't worry, this article got you covered. I will explain how to manage state with redux toolkit in detail.

I am Full Stack Developer. I completed my undergrad in Business Administration in 2022. I got started with tech in 2020 during my undergrad, I got to know the possibilities and outcomes that technology can achieve. That inspired me to be a Developer. I started my career as a web developer but I want to advance and explore several new technologies like blockchain, Machine Learning, Deep Learning etc. as I am a very curious person.
Introduction
In React, managing the state for a large project can be overwhelming, but tools like the redux toolkit make it easier to do that for you.
But, what is Redux?
Redux is a predictable state container for javascript apps. It provides a way to manage the application state in a single, immutable store that can be accessed from anywhere in the application.
Before the Redux toolkit, we used to create and handle all the actions, reducers and payloads manually with a redux store. Let's understand the Redux toolkit.
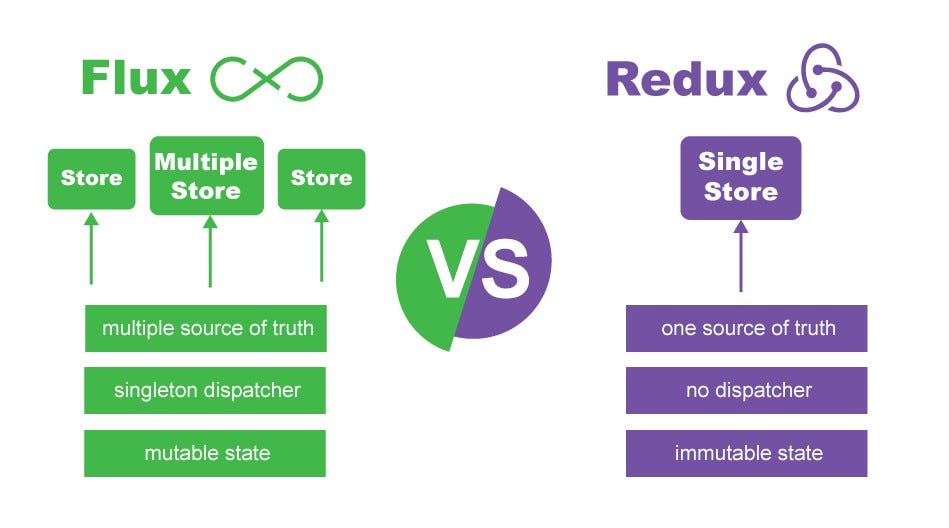
Redux under the hood uses Flux. It helps the Redux handle actions on dispatch.
What is Flux?
Flux is not a library nor a framework, it is an application architecture that is used by Facebook behind the scene in React. This architecture helps react to manage data flow i.e. unidirectional data flow.
Flux solved the problem of code implementation, understanding, reusing and testing the application by introducing a central state manager known as a store in redux. A store acts as a storehouse through which you can modify the state.
In Flux, you cannot modify the state directly without dispatching it. A dispatcher (the one who dispatches the actions) is the only one in control who can modify the states with certain actions via the store.
In Flux you can create and manage multiple stores but in Redux you can create and manage only one store. Redux uses Flux behind the scenes to make it more efficient and robust.
Example of Redux
Install the dependencies
npm install redux react-redux
This is a very simple example of a TODO app where we will be adding and getting the TODOs.
First, we define the actions which will contain the data you want to send to the reducer to mutate the state. Then, you define a Reducer with state and action, which will handle the operations you want to perform on state mutation. In the end, combine all the reducers in one place with combineReducers({}) and pass it in the createStore().
// Define action creators
const addTodo = (text) => ({
  type: "ADD_TODO",
  payload: {
    text,
  },
});

// Define reducers
const todosReducer = (state = [], action) => {
  switch (action.type) {
    case ADD_TODO:
      return [...state, { text: action.payload.text, completed: false }];
    default:
      return state;
  }
};

// Combine reducers
const rootReducer = combineReducers({
  todos: todosReducer,
});

// Create store
const store = createStore(rootReducer);
import { connect } from 'react-redux';

// Getting the updated state
const mapStateToProps = (state) => ({
  todos: state.todos,
});

// Instance of dispatch and pass it as props
const mapDispatchToProps = (dispatch) => ({
  addTodo: (text) => dispatch(addTodo(text)),
});

const TodoList = ({ todos, addTodo }) => {
  const [newTodo, setNewTodo] = useState('');

    // Handling the addTodo dispatch here
  const handleSubmit = (e) => {
    e.preventDefault();
    addTodo(newTodo);
    setNewTodo('');
  };

  return (
    <div>
      <form onSubmit={handleSubmit}>
        <input value={newTodo} onChange={(e) => setNewTodo(e.target.value)} />
        <button type="submit">Add</button>
      </form>
      <ul>
        {todos.map((todo, index) => (
          <li key={index}>{todo.text}</li>
        ))}
      </ul>
    </div>
  );
};

// Here we connect the component to mutate the state of the reducer
export default connect(mapStateToProps, mapDispatchToProps)(TodoList);
As you can see in the above code, we have to connect the Component to the store to access the state and actions. mapStateToProps have an object todos which contains the state and mapDispatchToProps dispatches the addTodo.
Action is the object that contains the payload and type of action you execute.
Dispatch is the only method that can mutate any state. It takes the action object as a parameter, passes it to the store and then the store runs the reducer function and mutates the new state.
To make the store available to all the components, we have to add a parent tag to the root Component, called Provider which will take the store as an argument.
import { Provider } from 'react-redux';
import store from './store';

// Providing store to all the components
ReactDOM.render(
  <Provider store={store}>
    <App />
  </Provider>
)
This was an example of redux without Redux Toolkit. It takes time to set up the actions, and reducers and pass it to the store.
Why Redux Toolkit?
Redux Toolkit makes Redux easy to use. Some of the reasons to use Redux Toolkit:-
Redux Toolkit simplifies store setup down to a single clear function call.
Redux Toolkit eliminates accidental mutations.
Redux Toolkit eliminates the need to write any action creators or action types by hand as we did in the above example.
Understanding Redux Toolkit with Example
Redux Toolkit is a library that helps simplify and streamline the process of writing Redux code. It provides a set of pre-built common behaviors that are required for redux use cases as well as utilities to simplify certain aspects of Redux development.
The below gif will give you a much clear idea and make you understand more that how the Redux toolkit works.

Let's look at an example. The example will be the same as we did above to understand the difference between simple Redux and Redux Toolkit
First, Install the dependencies
npm install @reduxjs/toolkit react-redux
Let's create a store. Remember we can only create a single store in the redux. configureStore simplifies the process of creating a Redux store.
import { configureStore } from '@reduxjs/toolkit';

const store = configureStore({
    // Add your reducers here
});

export default store;
Provide the store to the root Component, so that all the components can access it, same as before.
import React from "react";
import ReactDOM from "react-dom/client";
import "./index.css";
import App from "./App";
import { Provider } from 'react-redux';
import store from "./app/store";

const root = ReactDOM.createRoot(document.getElementById("root"));
root.render(
     <Provider store={store}>
      <App />
    </Provider>
);
createSlice generates reducers based on a set of predefined rules. You can export both actions and reducers. It can also help you create your actions easily. Let's see. (Please read the comments in the below code.)
import {createSlice} from "@reduxjs/toolkit";

// Initializing the initialState
const initialState = {
    todos: []
}

// Creating a slice
// You can give any name to the variable like here I have given todoSlicer
const todoSlicer = createSlice({
    name : "todoapp", // giving this slice a name
    initialState, // passing initialState
    reducers: {
        // Add TODO
        addTodo: (state, {payload}) => {
            state.todos = [...state.todos, payload];
        },
        // Delete TODO
        deleteTodo: (state, {payload}) => {
            state.todos = state.todos.filter((todo) => todo.id === payload.id)
        }
    }
});

// Exporting Actions to use in components
export const { addTodo, deleteTodo } = todoSlicer.actions;

// Exporting to Reducers to add it to the store
export default todoSlicer.reducers;
Add the above slice reducers to the store and the exported actions will be used while dispatching. As you can see below, the store contains all the reducers. From this store, you can access all the reducers you create using createSlice.
import { configureStore } from '@reduxjs/toolkit';
import todoReducer from "../todoSlice";

const store = configureStore({
    todoAction: todoReducer
});

export default store;
Let's create a component with some functionality concerned with the Redux store we created above.
import React, {useState} from "react";
import {useDispatch} from "react-redux";
import {useSelector} from "react-redux";
import {addTodo, deleteTodo} from "./features/todoSlice";

const Component = () => {

    const {todos} = useSelector((state) => state.todoAction);
    const dispatch = useDispatch();

    const [todo, setTodo] = useState("");
    function handleSubmit() {
        dispatch(addTodo({id: uuid4(), content: todo}))
    }

    return (
        <>
    <div>
      <form onSubmit={handleSubmit}>
        <input value={todo} onChange={(e) => setTodo(e.target.value)} />
        <button type="submit">Add</button>
      </form>
      <ul>
        {todos.map((todo, index) => (
          <li key={index}>
            <p>{todo.text}</p>
            <button onClick={() => dispatch(deleteTodo({id: todo.id}))}>Delete</button>
           </li>
        ))}
      </ul>
    </div>
        </>
    )
}

export default Component;
As you can see above code, we do not have to connect to the store while exporting as we did before.
useSelector is a hook that provides us with the current state of the reducer.
useDispatch is also a hook that helps us to handle actions.
So, in this component, as you can see I have added 2 functionality adding a todo and deleting a todo. The code here is much less and much easier to understand than the code we wrote before with simple Redux.
While dispatching the action, addTodo and deleteTodo contains some payload to mutate the state.
Let's conclude the whole flow of the state mutation. in the Redux Toolkit.
Step-1: Create any functionality which can trigger a dispatch method that can lead to state mutation.
Step-2: On dispatch, the action will go to the store and from there to the desired reducer.
Step-3: The reducer contains all the logic, so it will do its calculations or mutations that we provided.
Step-4: The mutated State will be returned and the Component will re-render to display changes.
Now, let's understand how to handle APIs using the Redux Toolkit.
Handling APIs with Redux Toolkit
There are two methods to handle API in Redux Toolkit. They are:-
CreateAsyncThunk
RTKQuery
We will only look at the createAsyncThunk in this article. RTKQuery has a different approach but it also uses createAsyncThunk behind the scenes.
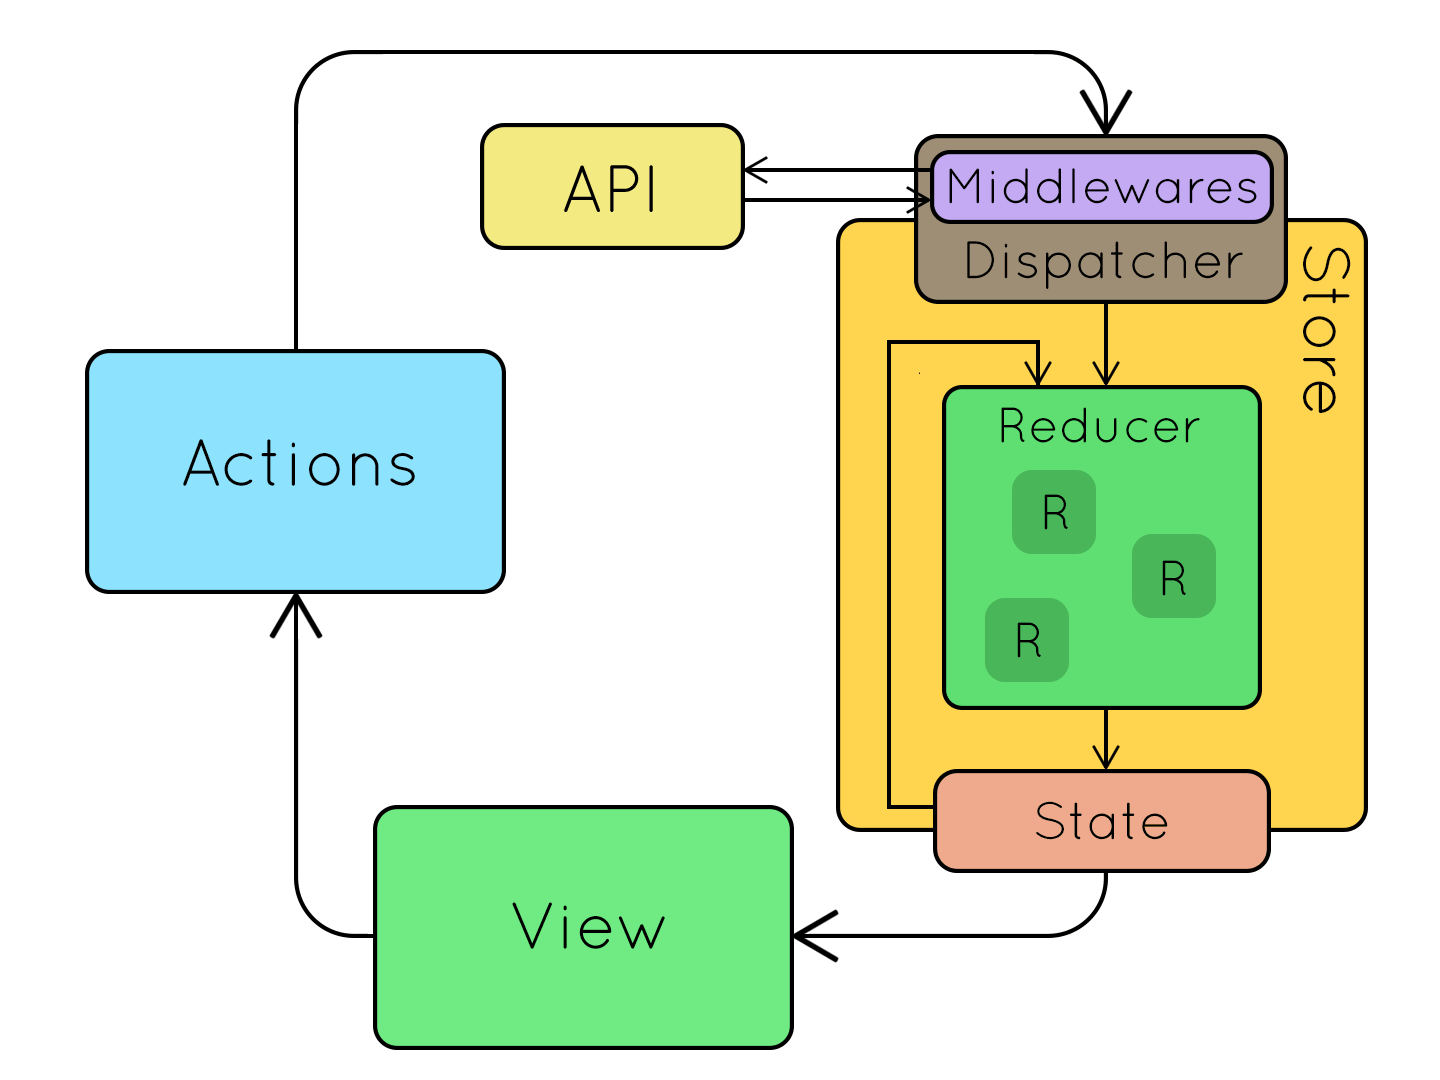
Above is the visual flow representation of API calls in the Redux Toolkit using createAsyncThunk. createAsyncThunk works as a middleware during an API call in the Redux Toolkit.
Middleware is something that sits in between doing some processes and returning the desired output. In a web server, Middleware is some instructions that process the request and sends a desired response.
Let's see an Example:-
I will be using a Quotes API - https://api.quotable.io/random, which returns an id, content, author's name, dateAdded, dateModified and tags. We will get a random quote on a button click.
We will create a store as we created above.
import {configureStore} from "@redux/toolkit";
import quotesReducer from "../features/quotesSlice";

const store = configureStore({
    quotesAction: quotesReducer
});

export default store;
I will skip the code block for making the store available to all the Components. Please refer to the previous code blocks, it is the same.
Let's jump directly to the Reducer and Action part.
import {createSlice, createAsyncThunk} from "@redux/toolkit";

const initialState = {
    quote: {},
    // We will use the below key-values to indicate Promises
    isLoading: false,
    isError: false,
    isSuccess: false
}

// Handling the API here using createAsyncThunk.
export const getRandomQuote = createAsyncThunk("quotes/random", async () => {
    let response = await fetch("https://api.quotable.io/random");
    response = await response.json();
    return response;
})

// All the state mutation from createAsyncThunk will be done in extrareducers
const quotesSlice = createSlice({
    name: "quotes",
    initialState,
    reducers: {
        clearState: () => initialState
    },
    extrareducers: (builder) => {
        builder.addCase(getRandomQuote.pending, (state) => {
            state.isLoading = true;
        }).addCase(getRandomQuote.fulfilled, (state, {payload}) => {
            state.isLoading = false;
            state.isSuccess = true;
            state.quote = payload;
        }).addCase(getRandomQuote.rejected, (state) => {
            state.isLoading = false;
            state.isError = true;
        })
    }
});

export const {clearState} = quotesSlice.actions;

export default quotesSlice.reducers;
You can see the whole code as to how to handle an API in Redux Toolkit using createAsyncThunk. I will break down the code to make you understand.
const initialState = {
    quote: {},
    isLoading: false,
    isError: false,
    isSuccess: false
}
Starting with initialState. A quote is an object that will contain the random quote data coming from the payload. isLoading will indicate where the request is pending or fetched or rejected. isError will indicate whether the request is rejected. isSuccess will indicate whether the request is fulfilled.
export const getRandomQuote = createAsyncThunk("quotes/random", async () => {
    let response = await fetch("https://api.quotable.io/random");
    response = await response.json();
    return response;
})
Here is createAsyncThunk function that handles the API, calls the API and returns the response. It has two parameters, one is the name of the thunk and another one is a callback function. This createAsyncThunk is a kind of action.
const quotesSlice = createSlice({
    name: "quotes",
    initialState,
    reducers: {
        clearState: () => initialState
    },
    extrareducers: (builder) => {
        builder.addCase(getRandomQuote.pending, (state) => {
            state.isLoading = true;
        }).addCase(getRandomQuote.fulfilled, (state, {payload}) => {
            state.isLoading = false;
            state.isSuccess = true;
            state.quote = payload;
        }).addCase(getRandomQuote.rejected, (state) => {
            state.isLoading = false;
            state.isError = true;
        })
    }
});
In the above code, quotesSlice contains name, initialState and reducers are the same as we saw before, but the responses from createAsyncThunk will be handled in extrareducers.
In extrareducers builder is the one that handles different cases from promises like pending, fulfilled and rejected. The fulfilled case will contain some payload you want the state to mutate to.
Let's see this in action in a Component.
import React, {useState} from "react";
import {useDispatch} from "react-redux";
import {useSelector} from "react-redux";
import {getRandomQuote} from "./features/quotesSlice";

const Component = () => {

    const {quote, isLoading, isSuccess, isError} = useSelector((state) => state.quotesAction);
    const dispatch = useDispatch();

    function handleQuotes() {
        dispatch(clearState());
        dispatch(getRandomQuote());
    }

    return (
        <>
    <div>
        {
            !isLoading && isSuccess && (
                <p>{quote.content}</p>
                <small>{quote.author}</small>
            )
        }
        {
            !isLoading && isError && (
                <p>There wan an error.</p>
            )
        }
        <button onClick={handleQuotes}>Get Random Quote</button>
    </div>
        </>
    )
}

export default Component;
As you can see above, we have dispatched the action of createAsyncThunk same as we did before, in the previous example.
Here, the clearState is used to reset the state to mutate the state correctly. If the clearState will not run then the state will not mutate as you want it to.
The createAsyncThunk works as a middleware. So, when the action is dispatched, it will go to the thunk and it will start processing the API. In the meanwhile, the reducer will return the initialState once and when the request has been resolved in the thunk, it will return the response and the state will be mutated and re-render again. If noticed the state will re-render two times one while the thunk is processing the request and one while it returns the response.
You can also handle post requests. You just have to pass parameters in the action when dispatched and in the callback of createAsyncThunk.


