Docker and Dockerhub made easy
Learn concepts of Docker, learn to run docker image locally and in production and learn to push it to Dockerhub.

I am Full Stack Developer. I completed my undergrad in Business Administration in 2022. I got started with tech in 2020 during my undergrad, I got to know the possibilities and outcomes that technology can achieve. That inspired me to be a Developer. I started my career as a web developer but I want to advance and explore several new technologies like blockchain, Machine Learning, Deep Learning etc. as I am a very curious person.
Introduction
Due to the rise in the demand for more efficient and fast applications in the world, containerizing the web application has not become important but a necessity for the application for scalability and maintainability.
Docker plays a major role in handling and solving issues related to scalability and maintainability. Docker was first released in March 2013 and was developed by Docker Inc.
What is Docker?
Docker is known as a "platform as a service". Docker is an open-source platform where you can develop, ship and run applications. It is a DevOps tool where your different components like frontend, backend etc. are deployed on different environments that increases the scalability and maintainability of every individual entity. It follows the microservices concepts.
In simple words, Docker is a platform where you can run your application in an isolated environment i.e. independent of your operating system or worrying about any requirements or specific versioning required to run an application.
Before starting the coding part let's understand some terminologies and core concepts of docker in detail and understand how docker works.
Core Concepts in Docker
Docker Image
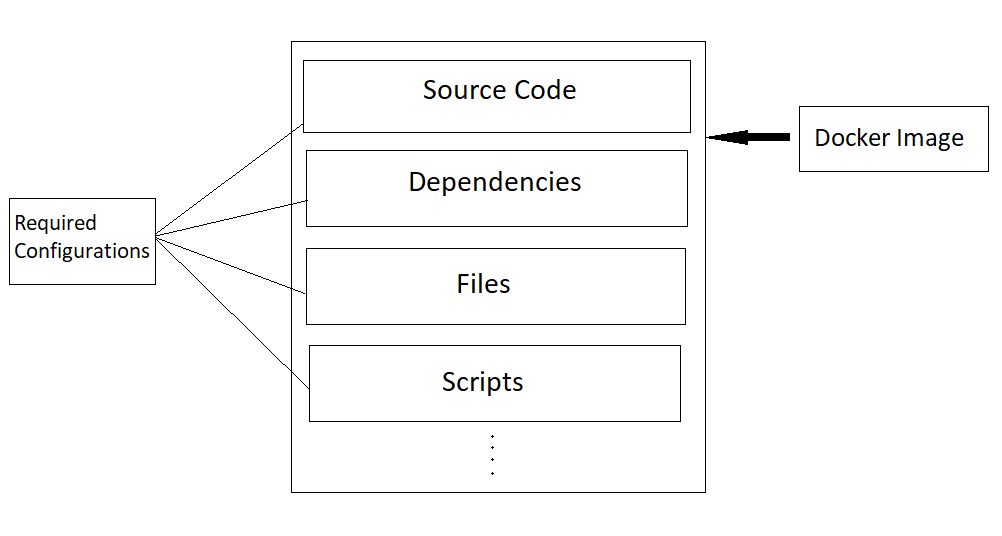
A docker image is an executable software that contains all of your code, dependencies, libraries, scripts, and filesystems and also contains all the configurations like environment variables etc. required to run your application in an isolated environment.
A single image is built up of many image layers. The image layers are a set of Dockerfiles with some instructions.
For Example: You created a node & express API which contains all your code, dependencies and all the things that are needed to run the API. It is a Docker Image with some additional configuration, which we will see later.
Docker Container
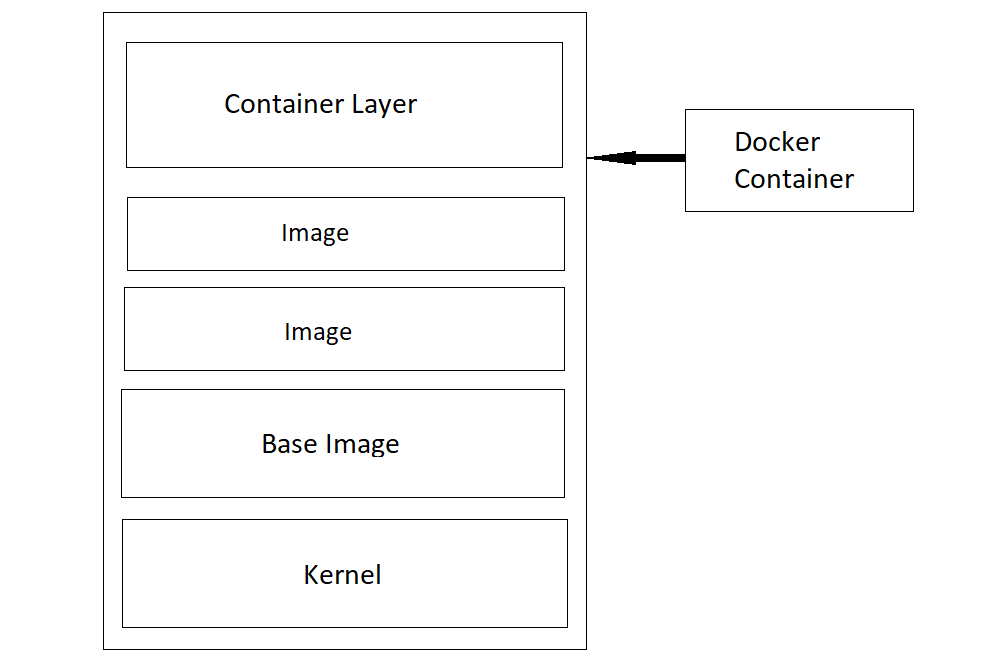
A docker container is nothing but a docker image in a runtime environment. A container contains a docker image and its operating system and also provides an isolated environment to run that docker image as an individual entity.
Containers Vs Virtual Machines

Virtualization
Both virtual machine and docker container provides an isolated environment but there is a difference.
Virtual Machines require their own guest Operating System on the host machine. Therefore, it virtualizes both the operating system and application layer.
Docker Container on the other hand virtualizes only the application layer and uses the host operating system.
Compatibility
VMs are independent of the host operating system. It is compatible with all the OS.
Whereas, containers are compatible with any Linux distribution. Before, there was a problem running a container in other OS like Windows, but they have solved it and we can run Docker easily on Windows also using Docker Desktop.
Size
Containers are lightweight and require very less space i.e. in kilobytes.
On the other hand, VMs requires a lot of space i.e. in gigabytes and sometimes terabytes.
Performance
As mentioned above containers are lightweight, so booting up containers takes very less time than VMs. You can start a container in milliseconds whereas VMs takes time.
Security
VMs are independent of the host machines, so if a host machine gets affected the guest OS is safe.
On the other hand, containers use host machines, so they might contain some security vulnerabilities but there is a way to handle this using Kubernetes Security.
Replication
If we are running multiple applications on different VM instances it could be inefficient to use VMs as they are resource intensive.
Container, on the other hand, due to its lightweight and performance, you can replicate them very easily. You just need to pull the image from docker registry.
Docker Volumes
A docker volume is used for persisting data that is generated and used by docker containers. It is a location on the container's disk that we have to bind with the location on the host's disk to keep the data in sync and persist it, this binding is called bind mounts.
Docker Registry
Docker Registry is the storage and distributing system for docker images with a specific name with different versions. Docker Registry is organized by Docker Repositories. Dockerhub is a great example of a Docker Registry.
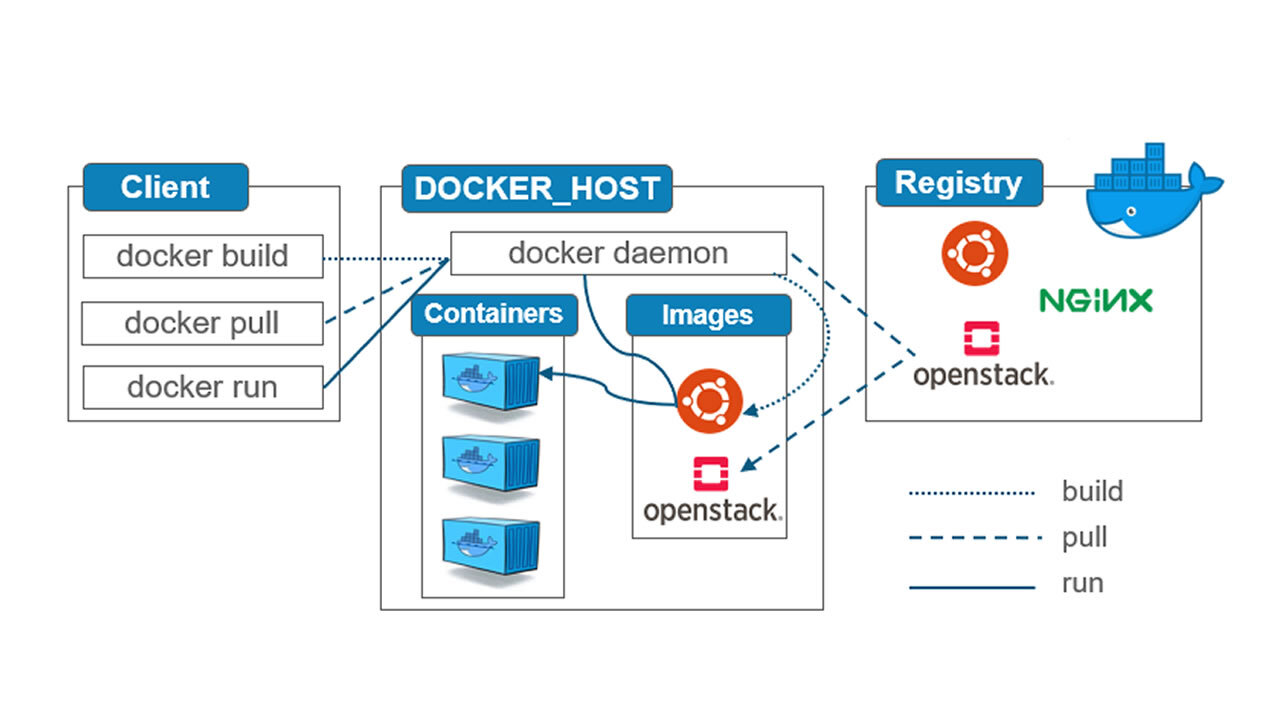
Architecture of Docker
As you can see in the below image you have three components in the architecture of docker. Docker uses a client-server architecture.
Runtime
Runtime in the docker allows us to start and stop the container
The runtime is divided into two types of runtimes which interact differently in the docker. They are:-
Run-c
Run-c is a low-level runtime that works at a level of Operating Systems.
Container-d
Container-d is a project of CNCF that was introduced later in the docker's architecture for the betterment. It is a high-level runtime that manages Run-c, containers and also helps the environment to connect to the internet and interact with it.
Docker Engine
Docker Engine contains three components:-
Docker CLI
Docker CLI is a command-line interface that lets you communicate with the docker daemon, which does all the processes that you provide via CLI. It is also called Docker Client.
API Server
API server in the docker engine helps to establish communication between the docker CLI and docker daemon. It is a middleware kind of thing.
Docker Daemon
Docker daemon is responsible for taking the requests from the API server and handling the docker objects like images, containers, volumes and networks.
Orchestration
Orchestration is a crucial part of the docker architecture as it helps in the scalability, maintainability, security and monitoring of multiple containers of the application. We can do orchestration with tools like Kubernetes, docker swarm etc. Kubernetes is the most famous and most used among all as it provides features that are more than orchestration.
Installation
To install docker on your local computer docker provides instructions for all the Operating Systems. Click on the link below, choose your operating system and follow the instructions.
Docker CLI Commands
There are a lot of pre-built images created by the docker community for developer convenience. So, we can just pull the images from the Dockerhub and start using it right away. Let's see some basic docker commands
To pull an image from the Docker Registry to your local machine.
docker pull image-name:tag

// Lets say I am pulling an ubuntu linux image from the Registry

docker pull ubuntu:latest
Visit Ubuntu Image here: https://hub.docker.com/_/ubuntu
imagename is the main image you want to pull and the tag is the kind of version you required for the project.

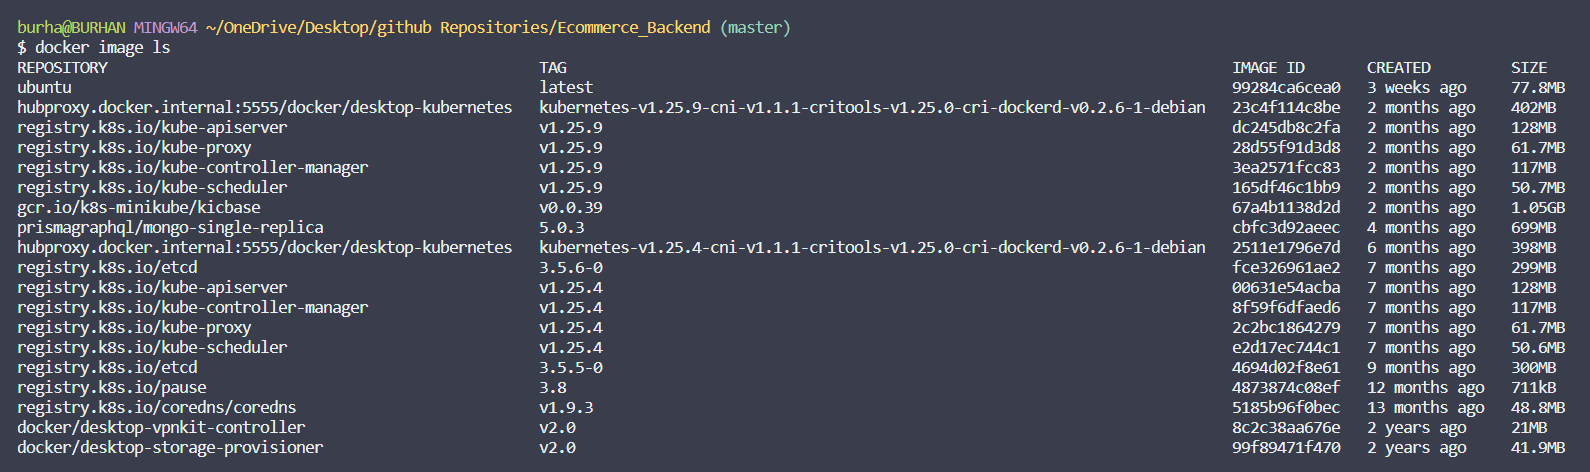
To get the list of all the images present in your local machine
docker image ls
To get image info
docker image inspect [imagename]
$ docker image inspect ubuntu
[
    {
        "Id": "sha256:99284ca6cea039c7784d1414608c6e846dd56830c2a13e1341be681c3ffcc8ac",
        "RepoTags": [
            "ubuntu:latest"
        ],
        "RepoDigests": [
            "ubuntu@sha256:6120be6a2b7ce665d0cbddc3ce6eae60fe94637c6a66985312d1f02f63cc0bcd"
        ],
        "Parent": "",
        "Comment": "",
        "Created": "2023-06-05T17:00:39.361599721Z",
        "Container": "d0606c58733ffd6f0353d72893f1dec960e9b551c629c1f250029be012e0771f",
        "ContainerConfig": {
            "Hostname": "d0606c58733f",
            "Domainname": "",
            "User": "",
            "AttachStdin": false,
            "AttachStdout": false,
            "AttachStderr": false,
            "Tty": false,
            "OpenStdin": false,
            "StdinOnce": false,
            "Env": [
                "PATH=/usr/local/sbin:/usr/local/bin:/usr/sbin:/usr/bin:/sbin:/bin"
            ],
            "Cmd": [
                "/bin/sh",
                "-c",
                "#(nop) ",
                "CMD [\"/bin/bash\"]"
            ],
            "Image": "sha256:d17b4ab170168d7b2fbd685124f529e405acf8aada0933843bde9ee6330303ea",
            "Volumes": null,
            "WorkingDir": "",
            "Entrypoint": null,
            "OnBuild": null,
            "Labels": {
                "org.opencontainers.image.ref.name": "ubuntu",
                "org.opencontainers.image.version": "22.04"
            }
        },
        "DockerVersion": "20.10.21",
        "Author": "",
        "Config": {
            "Hostname": "",
            "Domainname": "",
            "User": "",
            "AttachStdin": false,
            "AttachStdout": false,
            "AttachStderr": false,
            "Tty": false,
            "OpenStdin": false,
            "StdinOnce": false,
            "Env": [
                "PATH=/usr/local/sbin:/usr/local/bin:/usr/sbin:/usr/bin:/sbin:/bin"
                "/bin/bash"
            ],
            "Image": "sha256:d17b4ab170168d7b2fbd685124f529e405acf8aada0933843bde9ee6330303ea",
            "Volumes": null,
            "WorkingDir": "",
            "Entrypoint": null,
            "OnBuild": null,
            "Labels": {
                "org.opencontainers.image.ref.name": "ubuntu",
                "org.opencontainers.image.version": "22.04"
            }
        },
        "Architecture": "amd64",
        "Os": "linux",
        "Size": 77811629,
        "VirtualSize": 77811629,
        "GraphDriver": {
            "Data": {
                "MergedDir": "/var/lib/docker/overlay2/30099181f2344a4a782fa93cdc21bc766af630b5801acea9fc2eac7101db996e/merged",
                "UpperDir": "/var/lib/docker/overlay2/30099181f2344a4a782fa93cdc21bc766af630b5801acea9fc2eac7101db996e/diff",
                "WorkDir": "/var/lib/docker/overlay2/30099181f2344a4a782fa93cdc21bc766af630b5801acea9fc2eac7101db996e/work"
            },
            "Name": "overlay2"
        },
        "RootFS": {
            "Type": "layers",
            "Layers": [
                "sha256:cdd7c73923174e45ea648d66996665c288e1b17a0f45efdbeca860f6dafdf731"
            ]
        },
        "Metadata": {
            "LastTagTime": "0001-01-01T00:00:00Z"
        }
    }
]
To Run a Container
// You can run docker container using an image-name or the image-id
// You can find image-id from the above command

docker run [image-name]
To Run an Image with terminal
docker run -it ubuntu:latest

To Run a Container in detached mode
docker run -d [image-name]
When you run a container in a detached mode, it will be run in the background.
To start an existing container
docker container start [container-name]
To get a list of running containers
docker ps
To get a list of all the containers whether running or not
docker ps -a
To stop the running container
docker container stop [container-name]
To kill the running container
docker container kill [container-name]
There is a very slight difference between stopping a container and killing a container. stop will do a graceful shutdown and kill will force stop a container.
To expose a port to the container
docker run -p 3000:8080 -d [images-name]
The port on the left 3000 will be exposed to the outside world and 8080 will run inside a container and receives the requests coming from 3000.
To give a custom name to the container
docker container run --name [container-name] [image-name]
Nodejs & Express API with Docker (Example)
Let's see how to use docker in a real-world environment.
Create a simple Expressjs app.
Initialize Project
npm init -y
Install Dependencies
npm install express
npm install -D dotenv nodemon
// index.js

const express = require('express')
const app = express()
const port = 3000

app.get('/', (req, res) => {
  res.send('Hello World!')
})

app.listen(port, () => {
  console.log(`Example app listening on port http://localhost:${port}`)
})
Add the following scripts to your package.json
// package.json

"scripts": {
    "prod": "node index.js",
    "dev": "nodemon -L index.js"
}
Add a file named Dockerfile in the root directory of the project.
Dockerfile is necessary for providing instructions to the docker to run the local project on the base image. Here, the base image will be node:16 or any tag/version you want to use. You can check that here:- https://hub.docker.com/_/node
FROM node:16-alpine
WORKDIR /app
COPY package.json .
RUN npm install
COPY . ./
CMD ["npm", "run", "dev"]
FROM node:16-alpine
We are telling docker, what will be the base image of the app we want to run.
WORKDIR /app
Telling docker, what will be the directory name we want our source code to be. It is called a working directory.
COPY package.json .
Copying the package.json file in /app.
RUN npm install
Installing all the dependencies we require to run the application.
COPY . ./
Copying all the source code from the local to /app directory in the docker image.
CMD ['npm', 'run', 'dev']
Running the last command to start the application in the docker container environment.
This was the breakdown of the Dockerfile. It is a very simple example of how a Dockerfile is written. Now, we will see the application running in our local environment as a docker container.
Please make sure you have installed Docker Desktop or Docker on your machine.
First of all, you need to convert this application to a docker image. Let's see how.
docker build --tag node-app .
We are telling docker to build an image using Dockerfile and give it a name node-app.
Now, we can run the docker image, but we have to expose the ports inside and outside of the docker container for communication as the container is running in an isolated environment
docker run -p 3000:3000 -d node-app
So, we are exposing port 3000 inside the container and to the outside world as well. We are running the container in a detached mode. You can check your localhost:3000 on your desired web browser and the application is running.
To teardown the whole container you can use the following command
docker container stop [container-name]
docker container remove [container-name]

// if you also want to remove the image
docker image remove node-app
Now, let us take this to another level by connecting this application to a database. I will be using MongoDB.
npm install mongoose jsonwebtoken bcrypt
Connecting to MongoDB locally. If you do not have a MongoDB instance locally, you can skip this part and move forward to docker-compose.
// db.js
const mongoose = require("mongoose");
const config = require("../config.js")

const mongoURI = config.mongodb_uri

const connectToMongoDB = () => {
  mongoose.connect(
    mongoURI,
    () => {
      console.log("Connected to Mongo.");
    },
    {
      useNewUrlParser: true,
      useCreateIndex: true,
      useUnifiedTopology: true,
      useFindAndModify: false,
    },
    (err) => {
      if (err) return console.log("Error: ", err);
      console.log(
        "MongoDB Connection -- Ready state is:",
        mongoose.connection.readyState
      );
    }
  );
};

module.exports = connectToMongoDB;
// index.js

const express = require('express')
const connectToDB = require('db')

const app = express()
const port = 3000

connectToDB()

// ...
You can check whether the MongoDB is running on your local host or not.
Let's look at a new concept docker-compose.
What is docker-compose?
Docker-compose is a tool for defining, configuring and running multi-container Docker applications. With this, you can use a YAML file to configure your containers and then with a single command, you can start or stop them, all from the configurations.
Docker-compose will be used in the above project as we have to run two containers, one is for our main application and the other is for MongoDB. Let's see how will it work.
Let's Build a Simple User authentication and a CRUD application. Here, I have built a simple to-do app. You can skip this part and directly jump at the implementation of docker-compose.
Creating Models for User and ToDo List.
// models/User.js
const mongoose, { Schema } = require("mongoose");

const UserSchema = new Schema({
     name: String,
     email: String,
     phone: Number
     password: String
}, {
    timestamps: true
});

module.exports = mongoose.model("User", UserSchema);

// models/Todo.js
const mongoose, { Schema } = require("mongoose");

const TodoSchema = new Schema({
    title: String,
    description: String,
    user_id: Schema.Types.ObjectId,
    priority: String
}, {
    timestamps: true
});

module.exports = mongoose.model("Todo", TodoSchema);
// controllers/user.js
const User = require("../models/User.js");
const config = require("../config.js")
const bcrypt = require("bcrypt");
const jwt = require("jsonwebtoken")

// User Regitration
export const userRegister = async (req, res) => {
  let success = false;
  try {
    const { name, email, phone, password } = req.body;
    let user = await User.findOne({ email });

    if (user) {
      return res.status(400).send({
        success,
        message: "User already exists.",
      });
    }

    const salt = await bcrypt.genSalt(10);
    const securePassword = await bcrypt.hash(password, salt);

    user = User.create({
      basic: {
        name,
        email,
        phone,
        password: securePassword,
      },
    });

    if (!user) {
      return res.status(400).send({
        success,
        messgae: "Some Error Occurred",
      });
    }

    let data = {
      user: {
        id: user.id,
      },
    };

    const token = jwt.sign(data, config.jwt_secret);

    success = true;

    return res.status(200).send({
      success,
      message: "User Registered Successfully.",
      token
    });
  } catch (err) {
    return res.status(500).send({
      success,
      message: "Internal Server Error.",
    });
  }
};


// User Login
export const userLogin = async (req, res) => {
  let success = false;

  try {
    const { email, password } = req.body;

    let user = await User.findOne({ email });

    if (!user) {
      return res.status(400).send({
        success,
        message: "Invalid Credentials",
      });
    }

    const comparePass = await bcrypt.compare(password, user.basic.password);

    if (!comparePass) {
      return res.status(400).send({
        success,
        message: "Invalid Credentials",
      });
    }

    let data = {
      user: {
        id: user.id,
      },
    };

    const token = jwt.sign(data, config.jwt_secret);

    success = true;

    return res.status(200).send({
      success,
      token,
    });
  } catch (err) {
    return res.status(500).send({
      success,
      message: "Internal Server Error.",
    });
  }
};


// controllers/todo.js
const Todo= require("../models/Todo.js");

// All Todos
export const getAllTodo = async (req, res) => {
  let success = false;
  try {
    const todos = await Todo.find({user_id: req.user.id});
    success = true;
    return res.status(200).send({
        success,
        todos
    });
  } catch (err) {
    return res.status(500).send({
      success,
      message: "Internal Server Error.",
    });
  }
}

// Create a Todo
export const createTodo = async (req, res) => {
    let success = false;
  try {
      const { name, description, priority } = req.body;
      let todo = await Todo.create({
        name,
        description,
        priority,
        user_id: req.user.id
      });

      if (!todo) {
        return res.status(400).send({
            success,
            message: "Some Error Occurred."
        })
      }

      success = true;
      return res.status(200).send({
        success,
        message: "Successfully Todo added."
      });
  } catch(err) {
    return res.status(500).send({
      success,
      message: "Internal Server Error.",
    });
  }
}

// Update Todo
export const updateTodo = async (req, res) => {
    let success = false;
  try {
      const { name, description, priority } = req.body;
      const { id } = req.params;
      let todo = await Todo.findOneAndUpdate({ _id: id }, {
        $set: {
            name,
            description,
            priority,
        }
      });

      if (!todo) {
        return res.status(400).send({
            success,
            message: "Some Error Occurred."
        })
      }

      success = true;
      return res.status(200).send({
        success,
        message: "Successfully Todo updated."
      });
  } catch(err) {
    return res.status(500).send({
      success,
      message: "Internal Server Error.",
    });
  }
}

// Delete Todo
export const deleteTodo = async (req, res) => {
  let success = false;
  try {
      const { id } = req.params;
      let todo = await Todo.findOneAndDelete({ _id: id });

      if (!todo) {
        return res.status(400).send({
            success,
            message: "Some Error Occurred."
        })
      }

      success = true;
      return res.status(200).send({
        success,
        message: "Successfully Todo deleted."
      });
  } catch(err) {
    return res.status(500).send({
      success,
      message: "Internal Server Error.",
    });
  }
}
// routes/user.js
const express = require("express");
const { userRegister, userLogin } = require("../controllers/user.js");
const router = express.Router();

router.post("/register", userRegister);
router.post("/login", userLogin);

module.exports = router

// routes/todo.js
const express = require("express");
const { getAllTodo, createTodo, updateTodo, deleteTodo } = require("../controllers/todo.js");
const router = express.Router();

router.get("/", checkUser, getAllTodo);
router.post("/create", checkUser, createTodo);
router.put("/update/:id", checkUser, updateTodo);
router.delete("/delete/:id", checkUser, deleteTodo);

module.exports = router
// index.js
// ...
app.use("/api/user", require("./routes/user.js"));
app.use("/api/todo", require("./routes/todo.js"));
// ...
Configure a .env file for all your secrets.
// .env
JWT_SECRET=helloworld
MONGO_DB_URI=mongodb://localhost:27017
Create a config.js file to access your secrets from one place.
// config.js
const dotenv = require("dotenv");
dotenv.config()

module.exports = {
    jwt_secret: process.env.JWT_SECRET,
    mongodb_uri: process.env.MONGO_DB_URI
}
Now, we will start by creating docker-compose file and adding configurations. It will be a yaml file. Please remember, in yaml files spaces are very important.
We will start by defining the name of the project.
# docker-compose.yaml
version: "3" # version of docker-compose
services:
    todo-node-app: # name of the application container
        build: . # to build the docker container and start the application from current directory.
Great! we have told the file to build a docker container with the name todo-node-app. Now, we will add some more configurations like exposing the ports, adding env variables and running a command to run.
# docker-compose.yaml
version: "3"
services:
    todo-node-app:
        build: .
        ports:
           - "3000:3000"
        env_file:
           - ".env"
        command:
           - npm run dev
Great! we have configured the docker-compose for our application. Now let's configure MongoDB in the file.
# docker-compose.yaml
version: "3"
services:
    todo-node-app:
        build: .
        ports:
           - "3000:3000"
        env_file:
           - ./.env
        command:
           - npm run dev
    mongodb: # name of the mongodb container
        image: mongo:latest
        environment:
            - MONGO_INITDB_ROOT_USERNAME=username
            - MONGO_INITDB_ROOT_PASSWORD=password
        volumes:
            - mongo-db:/data/db
volumes:
  mongo-db:
Let's talk about the Mongodb container.
Here, for Mongodb container, I have used an already-built image i.e. base image from Dockerhub, as we used in the Dockerfile for our main application. In the environment section, we have added 2 env variables directly, without using .env file.
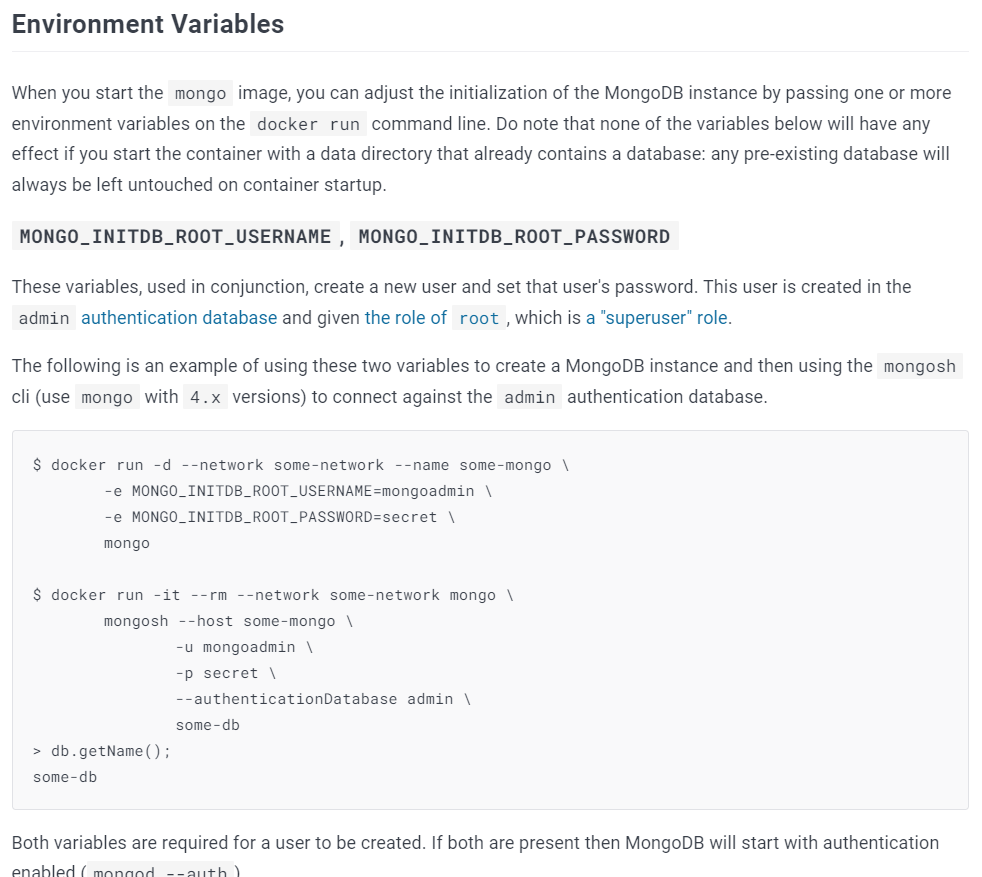
MONGO_INITDB_ROOT_USERNAME and MONGO_INITDB_ROOT_PASSWORD both are compulsory to pass as it is written in the description of the mongo image in Dockerhub.
You can also add your database name if you want to.

volumes:
    - mongo-db:/data/db
This is a very important part. Here, I have connected a volume with mongodb container to store our data and persist it. So, if we shut down the whole application the data will persist in the volume and we can reuse it.
mongo-db is the name of the database and /data/db is the file path inside the mongo image where the data is going when the request is made. What I have done is that the volume and data in the mongo image are going hand-in-hand, but the data in the mongo image will be deleted if the container shuts down but it will persist in the volume named mongo-db.
volumes:
  mongo-db:
Defining a volume named mongo-db.
To protect the secrets of your Mongodb container, we can pass the variables to .env file.
// .env

JWT_SECRET=helloworld
MONGO_INITDB_ROOT_USERNAME=username
MONGO_INITDB_ROOT_PASSWORD=password
MONGO_IP=mongo
MONGO_PORT=27017
MONGO_DB=todoDatabase
# docker-compose.yaml
version: "3"
services:
    todo-node-app:
        build: .
        ports:
           - "3000:3000"
        env_file:
           - ./.env
        command:
           - npm run dev
    mongodb: # name of the mongodb container
        image: mongo:latest
        env_file:
           - ./.env
        volumes:
            - mongo-db:/data/db
volumes:
  mongo-db:
There will be some changes in db.js also.
// config.js
const dotenv = require("dotenv");
dotenv.config()

module.exports = {
    jwt_secret: process.env.JWT_SECRET,
    mongo_username: process.env.MONGO_INITDB_ROOT_USERNAME,
    mongo_password: process.env.MONGO_INITDB_ROOT_PASSWORD,
    mongo_ip: process.env.MONGO_IP,
    mongo_port: process.env.MONGO_PORT,
    mongo_database: process.env.MONGO_DB
}
// db.js
const mongoose = require("mongoose");
const config = require("../config.js")

const mongoURI = `mongodb://${config.mongo_username}:${config.mongo_password}@${config.mongo_ip}:${config.mongo_port}/${config.mongo_database}?authSource=admin`

const connectToMongoDB = () => {
  mongoose.connect(
    mongoURI,
    () => {
      console.log("Connected to Mongo.");
    },
    {
      useNewUrlParser: true,
      useCreateIndex: true,
      useUnifiedTopology: true,
      useFindAndModify: false,
    },
    (err) => {
      if (err) return console.log("Error: ", err);
      console.log(
        "MongoDB Connection -- Ready state is:",
        mongoose.connection.readyState
      );
    }
  );
};

module.exports = connectToMongoDB;
Now, you can start the application containers in the docker by running the following command.
docker-compose up
To bring down all the application containers.
docker-compose down
Let's say you don't want to pass the env file in the docker-compose file. You can do something like this.
# docker-compose.yaml
version: "3"
services:
    todo-node-app:
        build: .
        ports:
           - "3000:3000"
        environment:
           - JWT_SECRET=${JWT_SECRET}
           - MONGO_INITDB_ROOT_USERNAME=${MONGO_INITDB_ROOT_USERNAME}
           - MONGO_INITDB_ROOT_PASSWORD=${MONGO_INITDB_ROOT_PASSWORD}
           - MONGO_IP=${MONGO_IP}
           - MONGO_PORT=${MONGO_PORT}
           - MONGO_DB=${MONGO_DB}
        command:
           - npm run dev
    mongodb: # name of the mongodb container
        image: mongo:latest
        environment:
            - MONGO_INITDB_ROOT_USERNAME=${MONGO_INITDB_ROOT_USERNAME}
            - MONGO_INITDB_ROOT_PASSWORD=${MONGO_INITDB_ROOT_PASSWORD}
        volumes:
            - mongo-db:/data/db
volumes:
  mongo-db:
You have to run the command with some parameters, to make the application containers up and running.
docker-compose --env-file ./.env up
You can bring them down as shown before.
Let's say you want to push the application code to the Dockerhub and share it with someone.
Steps for pushing your image to Dockerhub:-
Step 1:- Create an Account on Dockerhub
Step 2:- Create a New Repository & give it a name and description.
Step 3:- In the local terminal, you have to tell the Docker daemon where to push the image. You can do this by following the command.
docker tag local-image-name:tag-name username/repo-name:tag-name
In our case image will be todo-node-app.
Step 4:- Push the image to Dockerhub, by following the command.
docker push username/repo-name:tag-name
This was all from my side. I have explained all the things that need to get started with Docker and Dockerhub.


